BLOG

Right Arm Remedy
For many golfers, finding a groove on the range only to quickly lose it can be frustrating. You’ve hit a bunch of sweet drivers in a row before your tee time, but when it’s time to do it for real, that old pattern rears its ugly head, sending your ball into the trees or worse.
One of the biggest differentiators between the amateurs and pros, is the structure and behavior of the right arm throughout the swing. In this video, I show you an easy way to feel right arm structure, and how it relates to your body pivot in the backswing.

The Strong Strike Solution
If you’re a golfer struggling with the high miss to the right, chances are good that the clubface is getting twisted in an open position throughout the swing. When the face is too open, like it would be for a bunker shot or high lob, it’s very easy to suffer from poor contact, slices, and weakly hit shots. These three checkpoints will help you understand the difference between an open clubface, and one that’s in a more closed position for a stronger ball flight.
3 CHECKPOINTS FOR STRONGER SHOTS
If you’re a golfer struggling with the high miss to the right, chances are good that the clubface is getting twisted in an open position throughout the swing. When the face is too open, like it would be for a bunker shot or high lob, it’s very easy to suffer from poor contact, slices, and weakly hit shots. These three checkpoints will help you understand the difference between an open clubface, and one that’s in a more closed position for a stronger ball flight.
Checkpoint 1 - The Top
The first checkpoint is the top of the swing, or the point where the clubhead starts moving down towards the ball. At this point in the swing, the slicer often has the toe of the club pointing downward, towards the ground. To check your clubface, stop at the top of the swing, and observe the direction the toe is pointing. If it’s towards the ground, in an open position, get the feeling of twisting the club more closed, so the face of the club points more up to the sky.
Checkpoint 2 - Halfway Down
The second point in the swing to examine is the halfway down position. This is the point in the swing where your lead arm is parallel to the ground. In this position, imagine you’re looking back at yourself either in a mirror, or you’re being filmed from the standard “down the line” camera view you often see on TV, or in a golf lesson. Slicers tend to have the back of the club showing to the camera in this position, rather than the grooves of the club. If this sounds like you, practice stopping the arm parallel to the ground, and observe the face of the club. If it’s too open, practice twisting the clubface more closed, so the face or grooves of the club looks back towards the mirror, or the imaginary camera.
Checkpoint 3 - Last Parallel
The last checkpoint is pretty simple. Go ahead and bring the club down from the top of the swing, until it’s parallel to the ground. From this position check to see where the clubface is pointing. If it’s pointing up towards the sky, that’s an open position. From there, simply twist the face down, so it’s pointing slightly towards the ground. This feeling will definitely help get the face closing more near impact, giving you a stronger ball flight, and less slice. Also notice how your wrists feel as you twist the face more closed. This is often a great feeling throughout the swing to stop the ball from curving to the right.
Checkout the video to better understand the three checkpoints, and to get a visual understanding on what is open versus closed. If you can understand this concept, and start changing the clubface based upon one or two of these checkpoints, you can kiss that slice goodbye.
Perfect Practice Plan
For many golfers, finding a groove on the range only to quickly lose it can be frustrating. You’ve hit a bunch of sweet drivers in a row before your tee time, but when it’s time to do it for real, that old pattern rears its ugly head, sending your ball into the trees or worse.
For many golfers, finding a groove on the range only to quickly lose it can be frustrating. You’ve hit a bunch of sweet drivers in a row before your tee time, but when it’s time to do it for real, that old pattern rears its ugly head, sending your ball into the trees or worse.
A good groove doesn’t have to be a fleeting thing. Here are three essentials guaranteed to help build a more consistent swing.
UNDERSTAND YOUR PATTERN
In order to improve, you have to understand the concepts you’re working on. Whether it’s through video analysis, radar devices, or basic ball flight recognition skills, if you don’t understand your basic pattern and how to adjust it, you’ll never be able to execute with any type of consistency.
Find an instructor that gives you a clear roadmap you believe in. A good coach takes something that’s inherently complex and makes it both simple and doable. Develop a better understanding of what you’re supposed to do, and you’ll take a massive leap towards fast improvement.
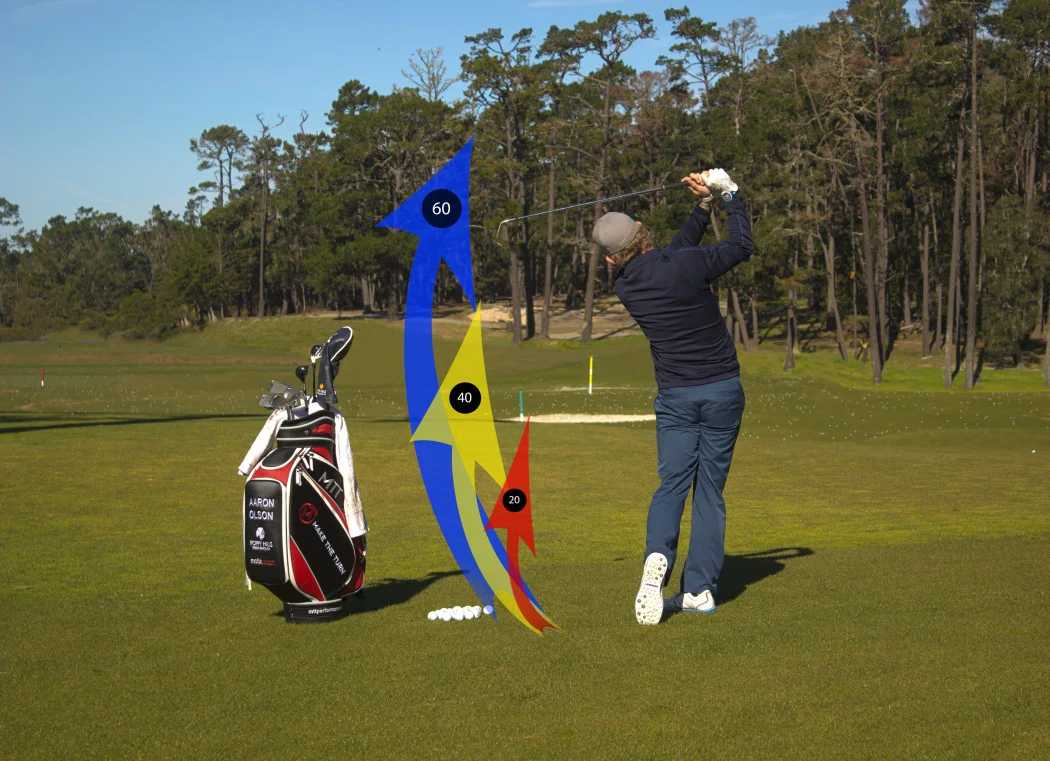
CLIMB THE LADDER
Once you’ve established a plan you understand, it’s time to start hitting balls using your new pattern. Imagine yourself standing at the bottom rung of a ladder, and each 20 yards is another step you need to take. Hit the first ball 20, the second 40, the third 60, and so on until your form starts to move towards your new pattern. Once you hit that breaking point, or rung on the ladder where old results return, head back down until you’re back at the 20 yard step.
There are two reasons why this is important. First, you’re tasking your brain with something new each time you hit the ball an additional 20 yards. Secondly, you’ll start to build an awareness as you get to higher speeds as to when your “old” pattern starts to creep in, and when your new positions start to falter. Do this well and there will be a distinct difference between the “old” and the “new”.
RULE OF THREES
As you’re going up and down the ladder, pick at least 3 different targets and move your focus back and forth between them on the range. While you’re doing that, make sure you do your drills with at least 3 different clubs, once again to challenge your brain with the new task at hand. The rule of threes can also easily be used around the greens. For every target you pick, always try to hit a low, medium, and a high shot to mix it up.
Challenge yourself to make a change to your golf game, and use these tips to create a lasting impression on your ball flight and shotmaking.

3 Point Finish
Short shots around the greens can be demonizing for weekend golfers, and sometimes can even jump up and bite the best of the best out on the PGA Tour. As coaches, we’re always running through checklists to prescribe a change to a student’s form; one that will make the largest positive impact, in the shortest amount of time. In fact, many times it’s a very simple, though integral fix to change their shotmaking ability around for the better. Take a look at these three highlighted areas, and figure out which one is holding you back from hitting those crisp, predictable short shots time after time.
Short shots around the greens can be demonizing for weekend golfers, and sometimes can even jump up and bite the best of the best out on the PGA Tour. As coaches, we’re always running through checklists to prescribe a change to a student’s form; one that will make the largest positive impact, in the shortest amount of time. In fact, many times it’s a very simple, though integral fix to change their shotmaking ability around for the better. Take a look at these three highlighted areas, and figure out which one is holding you back from hitting those crisp, predictable short shots time after time.
AROUND NOT DOWN
One of the most common mistakes I see from the club golfer, is a tilting of the shoulders backwards, away from the target, causing fat and thin shots. Notice how level to the ground my shoulders have finished, and how my right shoulder has turned past the point on the ground where the ball once was. This higher, more around right shoulder is a great visual, and a vital part in keeping the golf club moving around the body to the left in the follow thru.
Using this type of pivot, the golfer has the ability to hit multiple trajectory shots, depending on other factors, but is always right on target with clean contact. Check yourself with a smartphone to see that your trail shoulder isn’t moving too far down and back, in an effort to get the ball into the air.
KISS THE KNEES
A very simple way to improve your lower body action, is to imagine your knees kissing together into the follow thru. Way too often, golfers flex their right knee towards the ground aggressively, separating it from the left, and causing a stabbing action to the club head into the ground. Try focusing on the knees moving together in unison, as they both rotate towards the target evenly, leaving your kneecaps pointing more towards the target than when you started.
TIP THE SCALES
Last, but not least, is where the weight or pressure is distributed between your feet at the finish. You can have the best looking chipping motion in the world, but if you’re doing it while standing on your back foot, consistent contact will still be an issue. Keep the feet very close together, only one or two ball widths apart, and try hitting some short shots off of slight downhill lies to help you finish forward, not back.