BLOG
![Short Game Hack #1 [Learn Four Shots for the Price of One]](https://images.squarespace-cdn.com/content/v1/59270e28f7e0abc173a968c6/1546034305902-51VL3JWES9OOL1CD7P3B/IMG_2998.PNG)
Short Game Hack #1 [Learn Four Shots for the Price of One]
Tired and frustrated from mediocre chipping and pitching? Use this simple hack to gain four shots in your arsenal using the same basic technique.
The artistry and technique of the short game can take years to master, with thousands of repetitions and a lifetime of experiences needed to build a “Seve” like touch with a wedge. For almost all of us, that amount of practice, or any practice for that matter, is highly unlikely. Fortunately, there are ways to shortcut, or hack our way to a better short game without the countless hours of practice.

Learn One Shot, Get 3 Other Shots for Free!
The 60 degree sand wedge is truly a game changer around the green. Effortless height on the ball helps it land softly and stop within a reasonable distance, but for many golfers this comes with some drawbacks. Hitting multiple types of shots with the lob wedge can get tricky. There’s no worse feeling in golf than trying to hit the lower, running pitch shot with a lob wedge and blading it over the green. A lot of you have a comfortable basic shot you can hit with the wedge, that flies a certain distance with a certain swing speed. Let’s use your basic motion and basic speed with multiple clubs to build a short game that helps you navigate different situations on the course.
“Rather than learn 4 shots with one club, an alternative way to develop your short game could be to learn 1 shot and change clubs for different situations.
”
Set up the Basics
The first step is building the basic motion to work off of with your most lofted wedge in the bag. Place the golf ball in the middle of a narrow stance. There’s no need to put the ball behind your back foot, with the handle of the club leaning way forward. A neutral shaft position with the handle of the club just ahead of your zipper will give you plenty of shaft lean for solid contact. Keep your shoulders level at address, with a slight lean of your upper body towards the target.
Now for the swing. The key to the basic shot is to not overload any of your speed producers. Thoughts like “just use the arms” or “only use the wrists” or “just turn the body” are usually counterproductive over time, unless you know your tendencies very well and one of those thoughts helps even out your motion. The backswing is a blended motion of shoulders and arms, with the wrists helping you get the clubshaft to a parallel to the ground position just past your trail leg. The follow thru is more of the same, with a little pivot towards the target, arms swinging to belt level, and enough wrist action to give the ball a medium height off of the clubface.
Same Motion, 4 Different Shots
Once you’ve established your basic motion with the lofted wedge, it’s time to apply that motion to different clubs. Take the next two clubs in your set, and for your fourth club, skip one in between. For me, the four clubs I would use would be my 60 degree wedge, my 56, 52, and then skipping my pitching wedge to use my nine iron. Applying my basic motion using these four clubs will give me 4 different shots. As you’ll see in the video below, the range of shots using the same clubhead speed of around 31 MPH gives you a solid base to tackle a lot of situations you’ll have around the greens.

Aaron is a Master Lead Instructor at the Tour Striker Golf Academy, located in Phoenix, Arizona. To keep upgrading your game, make sure to subscribe below to weekly updates from the blog.

Build a Better Backswing Part 3 (The Tilts)
This weeks video shows the tilts in the backswing and how the knees, hips, and shoulders move on a tilted angle.
COMMENT below with more questions you have for the backswing!
Want to work with me online? Check out how to improve your game with my online coaching program here.
- Follow me social media:
- TWITTER - https://twitter.com/AaronOlsonGolf
- FACEBOOK - https://www.facebook.com/aaronolsongolf
- INSTAGRAM - https://www.instagram.com/aaronolsongolf/
- WEBSITE - http://www.aaronolsongolf.com

Build a Better Backswing Part 2 (Visuals and Explanation)
In the Build a Better Backswing Series, Part 2 is all about the turning pieces of the knees and how they flex to enable movement. Using Gears 3D technology in the first video, we were able to take a look at several different angles to see how the knees move.
In the below video, I lay out the drills and a live explanation of what this backswing practice could look like using a few simple tools.
To view the Gears 3D video to give yourself a better understanding of the topic, click here.

Build a Better Backswing Part 2 (Knee Action and Turn)
In the Build a Better Backswing Series, Part 2 is all about the turning pieces of the knees and how they flex to enable movement. Using Gears 3D technology in the first video, we are able to take a look at several different angles to see how the knees move.
Great knee action paves the way for the hips and shoulders in the backswing, which you can find more about in video one here.
In the below video, I lay out knee action from a professional golfer that I like to see.

Build a Better Backswing Part 1 (Drills and Explanation)
In the Build a Better Backswing Series, Part 1 is all about the turning pieces of the shoulders and hips. Using Gears 3D technology in the first video, I've laid out the amounts for both the shoulder turn and hip turn in a functional backswing. Before viewing this drill and explanation video, I recommend watching the first video here.
In the below video, I lay out the drills and a live explanation of what this backswing practice could look like using a few simple tools.

Build a Better Backswing Part 1 (Shoulder Turn and Hip Turn)
This is part 1 in a multi-part series dealing with the backswing. The easiest place to start when making backswing changes, and understanding backswing concepts, is with the turn.
Everyone is familiar with the turn of the shoulders and the hips. In this video, I show the shoulder turn and hip turn from a different view than we normally see, from the top, and bottom. Using Gears technology, we can take a closer look at the turn, and identify an easy way to practice it.

Right Arm Remedy
For many golfers, finding a groove on the range only to quickly lose it can be frustrating. You’ve hit a bunch of sweet drivers in a row before your tee time, but when it’s time to do it for real, that old pattern rears its ugly head, sending your ball into the trees or worse.
One of the biggest differentiators between the amateurs and pros, is the structure and behavior of the right arm throughout the swing. In this video, I show you an easy way to feel right arm structure, and how it relates to your body pivot in the backswing.

The Strong Strike Solution
If you’re a golfer struggling with the high miss to the right, chances are good that the clubface is getting twisted in an open position throughout the swing. When the face is too open, like it would be for a bunker shot or high lob, it’s very easy to suffer from poor contact, slices, and weakly hit shots. These three checkpoints will help you understand the difference between an open clubface, and one that’s in a more closed position for a stronger ball flight.
3 CHECKPOINTS FOR STRONGER SHOTS
If you’re a golfer struggling with the high miss to the right, chances are good that the clubface is getting twisted in an open position throughout the swing. When the face is too open, like it would be for a bunker shot or high lob, it’s very easy to suffer from poor contact, slices, and weakly hit shots. These three checkpoints will help you understand the difference between an open clubface, and one that’s in a more closed position for a stronger ball flight.
Checkpoint 1 - The Top
The first checkpoint is the top of the swing, or the point where the clubhead starts moving down towards the ball. At this point in the swing, the slicer often has the toe of the club pointing downward, towards the ground. To check your clubface, stop at the top of the swing, and observe the direction the toe is pointing. If it’s towards the ground, in an open position, get the feeling of twisting the club more closed, so the face of the club points more up to the sky.
Checkpoint 2 - Halfway Down
The second point in the swing to examine is the halfway down position. This is the point in the swing where your lead arm is parallel to the ground. In this position, imagine you’re looking back at yourself either in a mirror, or you’re being filmed from the standard “down the line” camera view you often see on TV, or in a golf lesson. Slicers tend to have the back of the club showing to the camera in this position, rather than the grooves of the club. If this sounds like you, practice stopping the arm parallel to the ground, and observe the face of the club. If it’s too open, practice twisting the clubface more closed, so the face or grooves of the club looks back towards the mirror, or the imaginary camera.
Checkpoint 3 - Last Parallel
The last checkpoint is pretty simple. Go ahead and bring the club down from the top of the swing, until it’s parallel to the ground. From this position check to see where the clubface is pointing. If it’s pointing up towards the sky, that’s an open position. From there, simply twist the face down, so it’s pointing slightly towards the ground. This feeling will definitely help get the face closing more near impact, giving you a stronger ball flight, and less slice. Also notice how your wrists feel as you twist the face more closed. This is often a great feeling throughout the swing to stop the ball from curving to the right.
Checkout the video to better understand the three checkpoints, and to get a visual understanding on what is open versus closed. If you can understand this concept, and start changing the clubface based upon one or two of these checkpoints, you can kiss that slice goodbye.
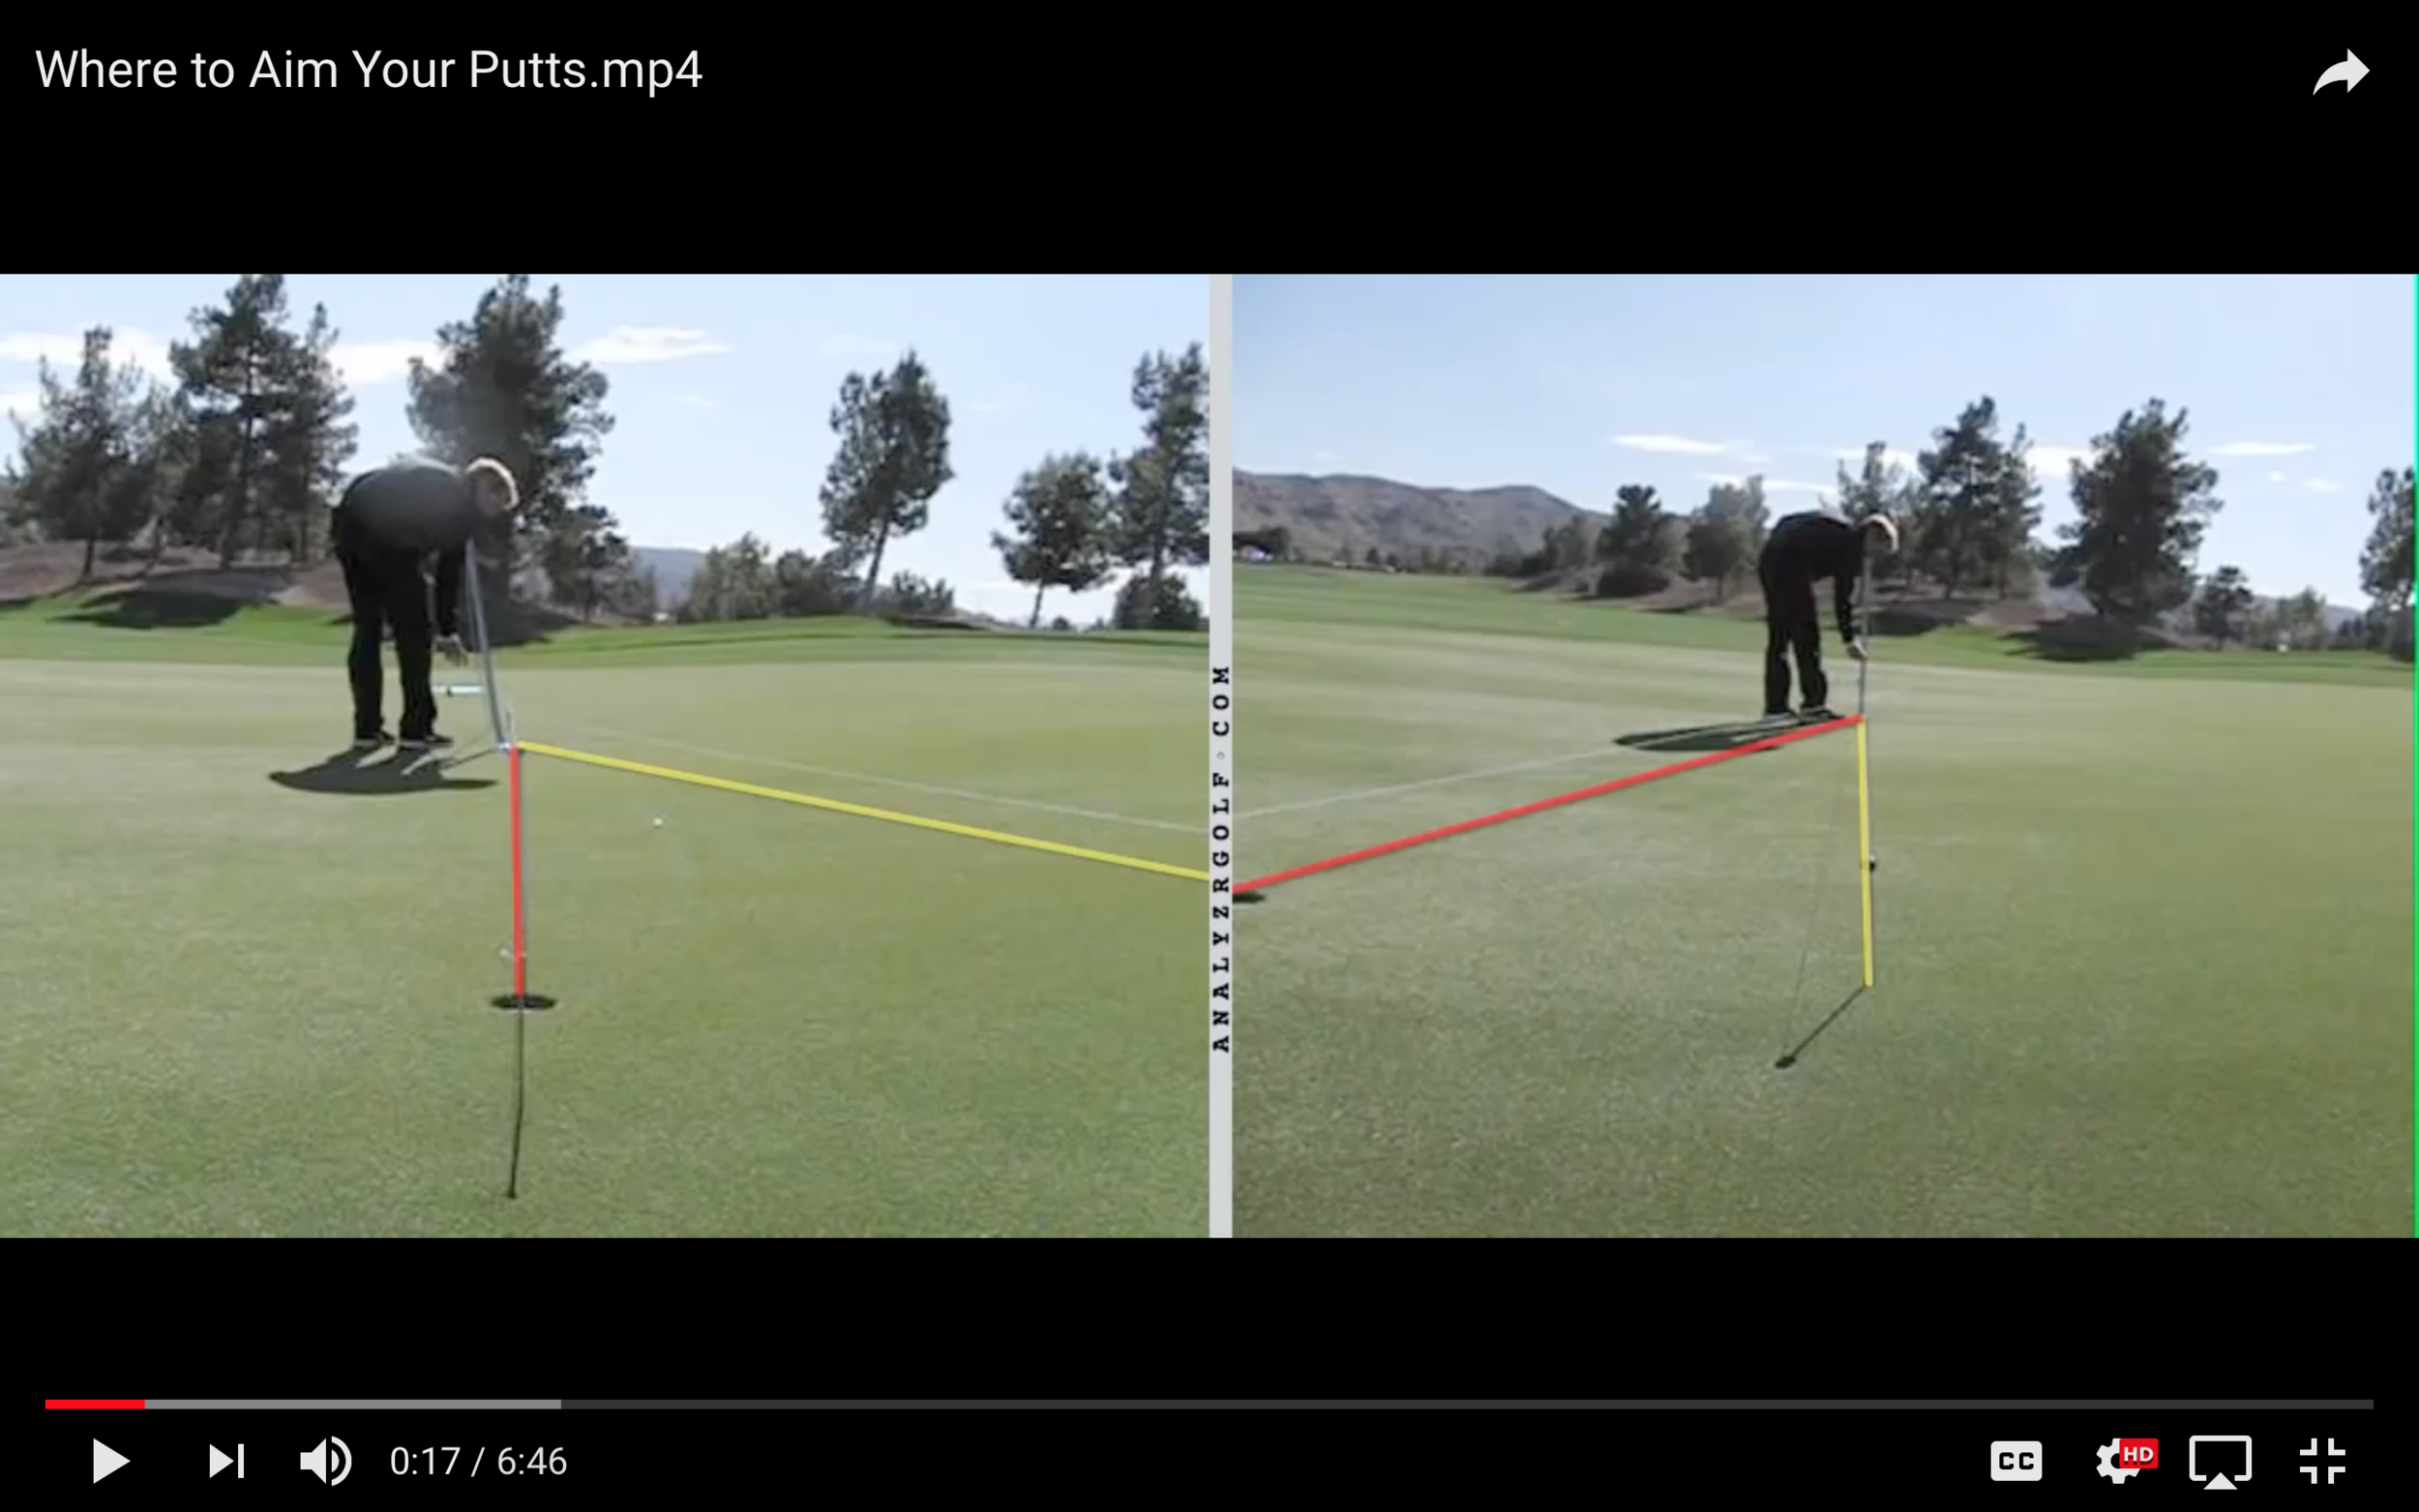
Where to Aim Your Putts
I get asked a lot of different things when it comes to putting, but one question that pops up frequently is, "Where should I aim my putts?"
When it comes to putting, we have the option to aim the putter at a couple different locations for a breaking putt...the apex point, the high point, etc.
This video explains how to putt better by getting a visual on the true amount of break, and where to aim your putts for the most success.
Want to work on your putting in person? Email me here for rates and programs.
-Aaron

Putt Like the Pros With 6 Simple Drills
6 Putting Drills for All Ages and Abilities
BETTER PUTTING IS JUST MINUTES AWAY
Making huge improvements on the greens doesn't have to be hard. There are many proven methods, grips, and green reading techniques that all get the ball into the hole.
I've put together 6 simple drills that anyone can do, that will dramatically improve your putting in a matter of a few sessions.
If you can carve out 20 minutes twice a week to try these drills, you will be crushing it on the greens and winning bets from your buddies.
To download the ebook and get the drills, click here.