BLOG

Build a Better Backswing Part 3 (The Tilts)
This weeks video shows the tilts in the backswing and how the knees, hips, and shoulders move on a tilted angle.
COMMENT below with more questions you have for the backswing!
Want to work with me online? Check out how to improve your game with my online coaching program here.
- Follow me social media:
- TWITTER - https://twitter.com/AaronOlsonGolf
- FACEBOOK - https://www.facebook.com/aaronolsongolf
- INSTAGRAM - https://www.instagram.com/aaronolsongolf/
- WEBSITE - http://www.aaronolsongolf.com

Build a Better Backswing Part 2 (Visuals and Explanation)
In the Build a Better Backswing Series, Part 2 is all about the turning pieces of the knees and how they flex to enable movement. Using Gears 3D technology in the first video, we were able to take a look at several different angles to see how the knees move.
In the below video, I lay out the drills and a live explanation of what this backswing practice could look like using a few simple tools.
To view the Gears 3D video to give yourself a better understanding of the topic, click here.

Build a Better Backswing Part 2 (Knee Action and Turn)
In the Build a Better Backswing Series, Part 2 is all about the turning pieces of the knees and how they flex to enable movement. Using Gears 3D technology in the first video, we are able to take a look at several different angles to see how the knees move.
Great knee action paves the way for the hips and shoulders in the backswing, which you can find more about in video one here.
In the below video, I lay out knee action from a professional golfer that I like to see.

Right Arm Remedy
For many golfers, finding a groove on the range only to quickly lose it can be frustrating. You’ve hit a bunch of sweet drivers in a row before your tee time, but when it’s time to do it for real, that old pattern rears its ugly head, sending your ball into the trees or worse.
One of the biggest differentiators between the amateurs and pros, is the structure and behavior of the right arm throughout the swing. In this video, I show you an easy way to feel right arm structure, and how it relates to your body pivot in the backswing.

The Strong Strike Solution
If you’re a golfer struggling with the high miss to the right, chances are good that the clubface is getting twisted in an open position throughout the swing. When the face is too open, like it would be for a bunker shot or high lob, it’s very easy to suffer from poor contact, slices, and weakly hit shots. These three checkpoints will help you understand the difference between an open clubface, and one that’s in a more closed position for a stronger ball flight.
3 CHECKPOINTS FOR STRONGER SHOTS
If you’re a golfer struggling with the high miss to the right, chances are good that the clubface is getting twisted in an open position throughout the swing. When the face is too open, like it would be for a bunker shot or high lob, it’s very easy to suffer from poor contact, slices, and weakly hit shots. These three checkpoints will help you understand the difference between an open clubface, and one that’s in a more closed position for a stronger ball flight.
Checkpoint 1 - The Top
The first checkpoint is the top of the swing, or the point where the clubhead starts moving down towards the ball. At this point in the swing, the slicer often has the toe of the club pointing downward, towards the ground. To check your clubface, stop at the top of the swing, and observe the direction the toe is pointing. If it’s towards the ground, in an open position, get the feeling of twisting the club more closed, so the face of the club points more up to the sky.
Checkpoint 2 - Halfway Down
The second point in the swing to examine is the halfway down position. This is the point in the swing where your lead arm is parallel to the ground. In this position, imagine you’re looking back at yourself either in a mirror, or you’re being filmed from the standard “down the line” camera view you often see on TV, or in a golf lesson. Slicers tend to have the back of the club showing to the camera in this position, rather than the grooves of the club. If this sounds like you, practice stopping the arm parallel to the ground, and observe the face of the club. If it’s too open, practice twisting the clubface more closed, so the face or grooves of the club looks back towards the mirror, or the imaginary camera.
Checkpoint 3 - Last Parallel
The last checkpoint is pretty simple. Go ahead and bring the club down from the top of the swing, until it’s parallel to the ground. From this position check to see where the clubface is pointing. If it’s pointing up towards the sky, that’s an open position. From there, simply twist the face down, so it’s pointing slightly towards the ground. This feeling will definitely help get the face closing more near impact, giving you a stronger ball flight, and less slice. Also notice how your wrists feel as you twist the face more closed. This is often a great feeling throughout the swing to stop the ball from curving to the right.
Checkout the video to better understand the three checkpoints, and to get a visual understanding on what is open versus closed. If you can understand this concept, and start changing the clubface based upon one or two of these checkpoints, you can kiss that slice goodbye.
Perfect Practice Plan
For many golfers, finding a groove on the range only to quickly lose it can be frustrating. You’ve hit a bunch of sweet drivers in a row before your tee time, but when it’s time to do it for real, that old pattern rears its ugly head, sending your ball into the trees or worse.
For many golfers, finding a groove on the range only to quickly lose it can be frustrating. You’ve hit a bunch of sweet drivers in a row before your tee time, but when it’s time to do it for real, that old pattern rears its ugly head, sending your ball into the trees or worse.
A good groove doesn’t have to be a fleeting thing. Here are three essentials guaranteed to help build a more consistent swing.
UNDERSTAND YOUR PATTERN
In order to improve, you have to understand the concepts you’re working on. Whether it’s through video analysis, radar devices, or basic ball flight recognition skills, if you don’t understand your basic pattern and how to adjust it, you’ll never be able to execute with any type of consistency.
Find an instructor that gives you a clear roadmap you believe in. A good coach takes something that’s inherently complex and makes it both simple and doable. Develop a better understanding of what you’re supposed to do, and you’ll take a massive leap towards fast improvement.
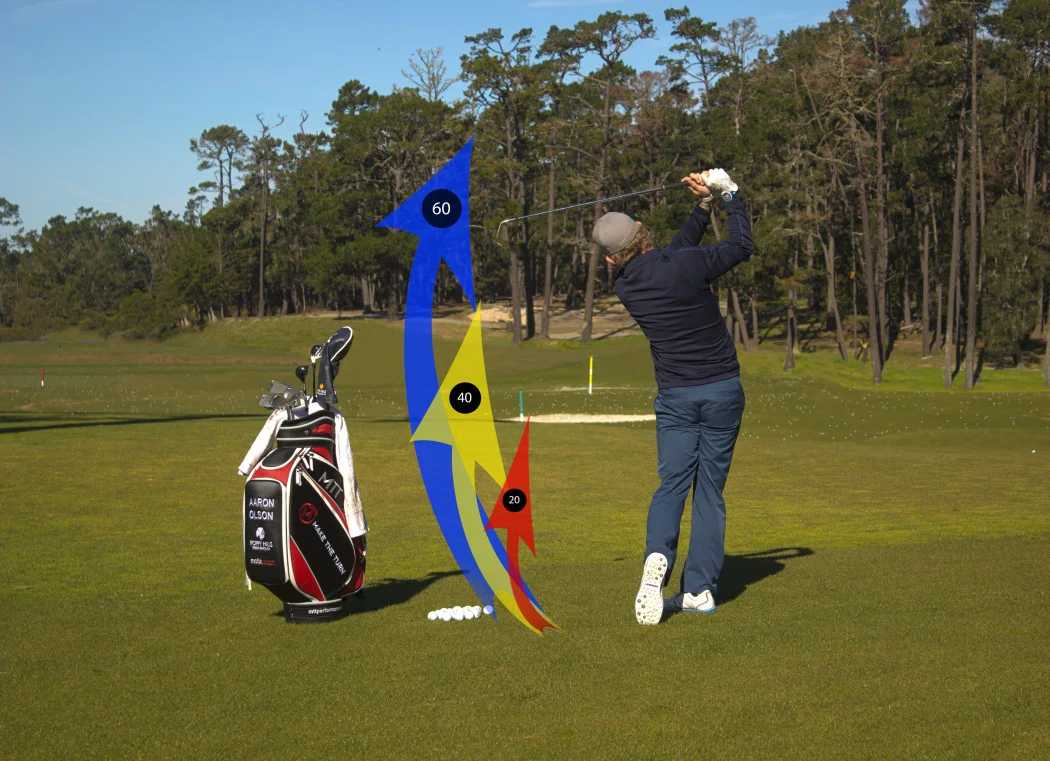
CLIMB THE LADDER
Once you’ve established a plan you understand, it’s time to start hitting balls using your new pattern. Imagine yourself standing at the bottom rung of a ladder, and each 20 yards is another step you need to take. Hit the first ball 20, the second 40, the third 60, and so on until your form starts to move towards your new pattern. Once you hit that breaking point, or rung on the ladder where old results return, head back down until you’re back at the 20 yard step.
There are two reasons why this is important. First, you’re tasking your brain with something new each time you hit the ball an additional 20 yards. Secondly, you’ll start to build an awareness as you get to higher speeds as to when your “old” pattern starts to creep in, and when your new positions start to falter. Do this well and there will be a distinct difference between the “old” and the “new”.
RULE OF THREES
As you’re going up and down the ladder, pick at least 3 different targets and move your focus back and forth between them on the range. While you’re doing that, make sure you do your drills with at least 3 different clubs, once again to challenge your brain with the new task at hand. The rule of threes can also easily be used around the greens. For every target you pick, always try to hit a low, medium, and a high shot to mix it up.
Challenge yourself to make a change to your golf game, and use these tips to create a lasting impression on your ball flight and shotmaking.

Lower Body Launch
One of my favorite swing “keys” is to imagine a pop can or a wet sponge underneath your front foot. As you approach the end of your backswing, think of crushing the can or squeezing the water out of the sponge. If you’re still struggling to find ball then turf contact, put a little more weight into the can/sponge at address. This added forward weight at address will help “prime” your downswing move, while ensuring you’re not swaying too much off the ball into the backswing.
Developing a stronger lower body move is a great way to yield rewards in all facets of your ball striking. A key area I like to look at on the lesson tee is the action of the legs, specifically the lead knee. This may seem like a small area of focus, however, stepping up this one aspect of your swing can deliver big-time results!
IMPACT
Whether you’re talking about old-time greats such as Hogan and Trevino, or modern swingers like Rory McIlroy or Adam Scott, all top level players hit consistently solid golf shots. One swing characteristic they share in common is a forward and downward movement with their lead knee that begins before the end of the backswing. This forward leg shift, helps direct the bottom of the swing into the proper spot (Just ahead of the ball) helping produce clean contact time after time.
“Power without control is a tough way to shoot lower scores!”
One of my favorite swing “keys” is to imagine a pop can or a wet sponge underneath your front foot. As you approach the end of your backswing, think of crushing the can or squeezing the water out of the sponge. If you’re still struggling to find ball then turf contact, put a little more weight into the can/sponge at address. This added forward weight at address will help “prime” your downswing move, while ensuring you’re not swaying too much off the ball into the backswing.
SPEED
Imagine hitting a tennis serve holding the racquet above your head, using only your wrist. You wouldn’t produce much power would you? Now consider adding in some swing with your arm, while flexing your elbow. This would add a little more speed right? Finally, what if as you tossed the ball into the air, you bent both legs and pushed off of the ground? That would be an efficient way to sequence a serve, to create maximum speed into the head of the racquet. Golf is similar, in the respect that a strong lower body move sets the stage for the supporting action of the hands and arms to deliver a powerful hit.
To really feel this move, hit a few shots by starting with 80% of your lower body weight on your front foot at address, with your lead knee flexed a little bit. Take a 3/4 backswing, and then push forward and up with your lead knee through the hit, using the ground like a catapult. It’s amazing how much speed can be gained by doing this sequence in the right order.
CONTROL
Power without control is a tough way to shoot lower scores. If you’re fighting a banana ball, improving your lower body action can flip that slice into a draw in a heartbeat.Follow the lower body sequence above, adding in one extra detail. As you shift forward, keep your hips pointed to the right, as if to angle down the first base line on a baseball diamond. Keeping your hips closed “longer” helps shift the path of your clubbed more out to the right of the target. An impact characteristic essential for hitting a draw.
To really try and hook one, try setting your hips and shoulders down the right rough line at address, and maintain the feeling of them being closed throughout the downswing. You’re probably not going to “play” this way, but if you’ve been a long-time slicer, it’s really nice to know you can hook it anytime you want.